Thursday, November 24, 2011

Happy Thanksgiving!

Happy Thanksgiving to you all! 


 Wishing you all a blessed day, with the ones you love.


Kelly

Sunday, November 20, 2011

Snowflake Candle

Hi there!  I'm so glad you stopped by

Here's a little something I was working on today.  A snowflake candle.  Below I will show you how I did it.


First you will need a glass candle holder.  You can get these just about anywhere.  I found mine at the Dollar Store.  You will also need Mod Podge, a sponge brush, some little jewels, some Epsom Salt, a white paint pen and a votive candle. 


First, I took the glass candle holder and painted snowflakes on it with a paint pen.  I then added little jewels to the middle of the snowflakes using my trusty glue gun.


Second, I took the votive candle and painted it with Mod Podge, using the sponge brush.  Then, I rolled it in Epsom Salt.  If you have never used Epsom Salt before, it is the perfect fake snow!


Add Epsom Salt to the bottom of your glass candle holder, set your votive in the "snow" and, Viola, you have a snowflake candle.  These would work great on the fireplace mantle, in your centerpiece or on your walk leading up to your house on Christmas Eve!


Thank you so much for stopping by.  It means the world to me.

Kelly

Monday, November 14, 2011

The Wooden Box

Hi There. I'm so glad you stopped by!

Today I want to share a little project my amazing husband and I put together this week.

If you saw the post I did a while back, The Fall Housewarming Gift, you might remember I used a box that looked like this one.

I found it at a little shop up by Lake of the Woods, last summer.


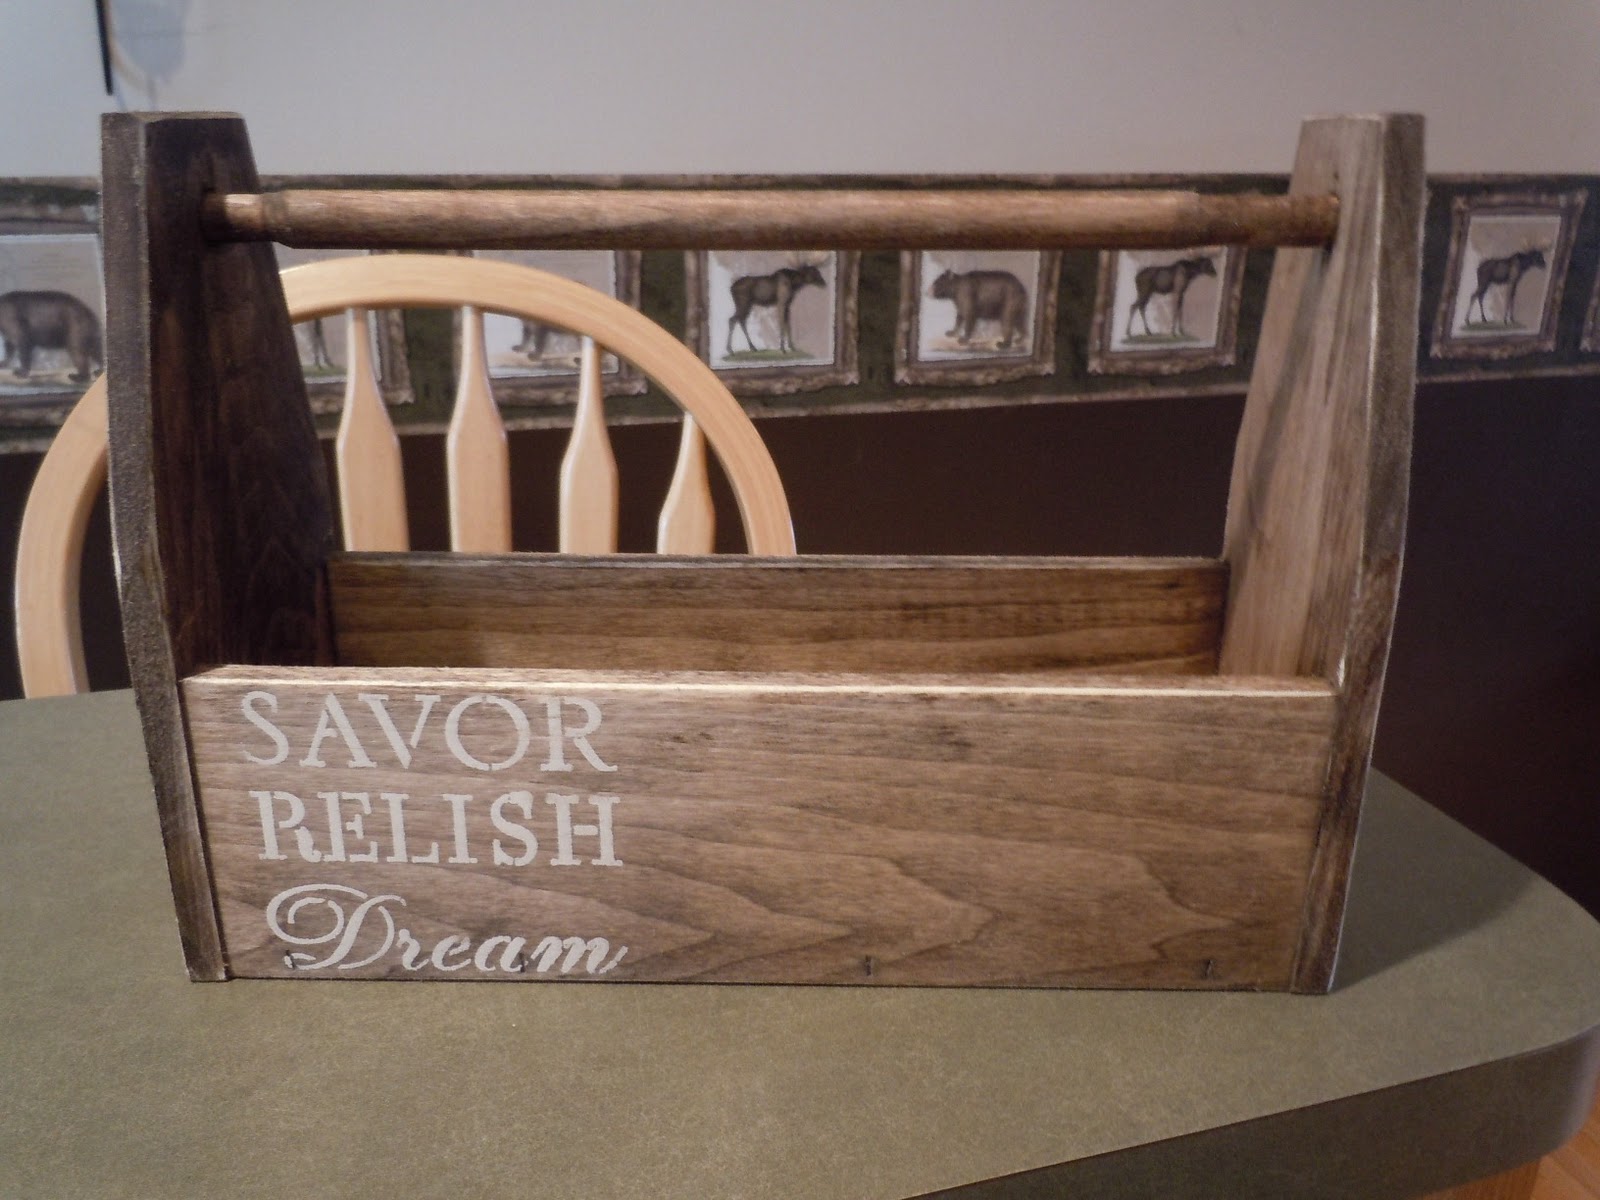
I was really torn about giving my newest love away, a simple little wooden box, as part of the gift.  I know you are all thinking, seriously it's just a wooden box.

I decided that I could ask my husband to help me re-create that little treasure.  He was actually really excited (if you know my husband, you know not much excites him), and ready to help me out. He's pretty creative himself.  Noted for future projects!

I made a pattern and gave it to him.  We went shopping for the materials one night and by the time I got home from work the next day, he had one made for me.  Could you hear the excitement all the way from Ham Lake?? I'm pretty sure my neighbors are still wondering about that one.


I wanted it to have a rustic feel.  I had never stained and painted the same project and wasn't sure if it was going to work.  But I thought, what the hay, I will just have that amazing husband of mine, make me another one if I wreck it.

So I nervously stenciled the box first.


My newest love, stenciling. Yep, L.O.V.E. it!


Then I stained it.....holding my breath the whole time.  Not wanting to look, just in case I ruined it.  Have you ever tried to stain and not look at what you're doing?


I was so excited that it worked.  It actually made the paint finish look really good.  Then I took the ole' sander out and roughed it up a bit.

Keep in mind, I am not a photographer.  This picture doesn't really do it justice, so I'm hoping you can get the feel.

I'm pretty excited about all the things I can use these for.  In the bathroom, with jars holding Q-tips, cotton balls, and soap.  On the buffet table, holding knives, forks and spoons.  Just use your imagination.  I know I will.


By the way, I will be putting these in "Finch's Holiday Boutique" the first weekend in December if you want one, wink wink!

Next little wooden project, a recipe box.  Thanks Tiffany, for the idea!


Thank you so much for stopping by.  It means so much to me.

Kelly

Tuesday, November 8, 2011

Christmas Centerpiece

Hi there! I am so glad you stopped by.

I am so excited and honored to part of "Finch's Holiday Boutique", the first week in December. I have never done this before and honestly am a lot little scared.

If you are looking for great gifts or decorating items, this is the place you will want to go.It is being hosted by my amazingly talented cousin, Elisa.  Many of you already know of her through my bragging about what a talented little lady she is. I am very proud of her!

If you are interested you can find information on facebook at "Finch's Holiday Boutique" or at Elisa's blog at finchsboutique.blogspot.com.


My Christmas Centerpiece.


I started this little project by going to Michael's and buying a small Christmas wreath. I am not adding a picture of the plain wreath because you all know what that looks like.  Here is what it looked like after I added some berries, pinecones, a few red bulbs and some stars.


I took a glass cylinder candle holder and added some burlap ribbon, twine and another one of those rusty stars (I'm in love with rusty old looking things). I filled the bottom with pinecones and red bulbs. The top has a glass insert where I placed a votive candle, also from Michael's.


I went to Walmart and picked up a glass bowl to put in the middle to add, you guessed it, more pinecones and red bulbs and the candle holder in the middle. 


And, Taa Daa!  A centerpiece for the Christmas Season. 

I would love to hear what you think of this. Do you like it?  Would you put it on your coffee table, kitchen table, vanity?


Thanks you so much for stopping by.  It means the world to me!

Kelly

Turkey and Veggie Egg Bake

Hi!  We're so glad you stopped by!  I apologize for the lack of recipe updates.  To be honest, I didn't think anyone would want ...