Sunday, December 30, 2012

Repurpose and Reuse Ideas

Hi there!  I'm so glad you stopped by.

I hope you had a wonderful Christmas and are looking forward to 2013, with all the ups and downs it will certainly offer.

Today, I'm going to share how I take random things and use them in different areas.  I hope it will inspire you to change things up a bit.

I L.O.V.E. to take things and use them in random areas.  Such as.......

The great lights my husband found. 

They were in a building that is over 100 years old, where they make furniture. 

They were switching out these lights and they were going to through them in the garbage!  Can you believe it? Throwing these beauties away.  Insert my scream here!


So, being the amazing husband that he is, and knowing my love for reusing things and my obsession with lights, he brought them home to me. 

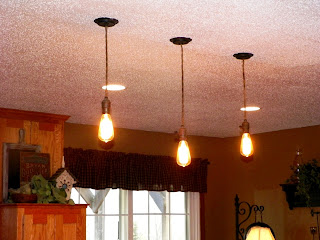
We added these Edison Bulbs that you can find at Home Depot, and instantly fell in love with them.

To me, they are the focal point of our kitchen/dining room.


At another remodel he was working on, a gentleman was re-doing his bathroom. 

He had 2  bathroom light fixtures that he was going to throw out.  Again, my husband brought them home for me to see what I would do with them.

I hung one of them on our deck of course!


It hangs above the table in our little sitting area.  I would show you the deck, but it is covered with snow and not looking very pretty right now. 

I love to look out our patio door and see this charming little light hanging there.


Remember how I've told you that when you decorate, especially a large space, have a focal point.  Something that you will decorate around.

Well, I've decided that I am going to decorate around a mirror that I have had sitting in the basement since I redid my bathroom. 

Remember this mirror?


Well, I'm going to use it on the fireplace, as my focal/starting point. 

Since I'm convinced I have the biggest fireplace on the planet, which makes it really difficult to decorate, I need something huge to anchor it.


Stay tuned to see the mirror face lift and how I am going to decorate my mantel for Winter/Valentine's Day.

Thank you so much for stopping by.  It means the world to me.

Kelly
Monday, December 17, 2012

Hostess Gift


Hi there!  I'm so glad you stopped by.

Are you attending a party or dinner in the next week?  If you are like our family, you are doing both.

I have a super easy gift idea for you.

A candle with a decorative sleeve.

You can put this together in less than 30 minutes.


Last year, I got candles from Yankee Candle for 75% off, on the day after Christmas. 

Another place to get great candles is Walmart.  You can get the large ones for $5.00 and they smell as good as the Yankee Candle.

I bought a bunch and have stored them knowing that they would make great hostess gifts.


So here's how easy they are to dress up.

Take a piece of burlap and cut it about 2 inches larger than the candle.  Fold over the edge and hot glue it in place.


Next I took a metal Christmas ornament I had and fished a piece of twine through the hole. 

I wrapped it around the top of the jar and hot glued the knot, I also glued the ornament to the front, to keep it in place.  

Put it in a gift bag and you are set to show the hostess how much all her hard work means to you.


You could use so many things for this project.  Fabric and ribbon.  Craft paper and stickers.  Let your imagination run wild, ladies.

Thank you so much for stopping by.  It means the world to me!

Kelly


Monday, December 10, 2012

Easy Christmas Swag

Hi there.  I am so glad you stopped by!

Tonight, I want to share with you what I made for our railing. A Christmas Swag.

I decided I wanted to downplay the handrail and jazz up the corner posts.

  In years past, I've typically decorated the ever lovin daylights out of the railing and done a single bow on the corner posts. 

This year, I'm living on the edge and changing it up!

So, here is what I came up with.


These were so easy to make and with only a few items, you can make a big statement.

A pine branch (I've had for 857 years), gold sprays and ribbon (Michael's), bulbs (Target) and wire.

I did not glue any of this, because knowing myself, like I do, I will change it next year.

You can also use real pine branches for this, but I prefer the fake because of the wired branches.  It works great for hanging the bulbs and stuffing the sprays in to. 


I took the pine branch and added the gold spray. 

I attached it by twisting one of the pine branches around it.


I took at piece of wire and wrapped it around the post, on my railing, to hang it. 

I added a bow, hung a few bulbs on it and stuffed one more piece of gold spray in the top.

Seriously, could this be any easier?


The only thing I would do differently next time, is add 3 bulbs instead of 2.  My rule of thumb is, always go with odd numbers when decorating.

Here is another view, showing a little more of the gold spray underneath.


Thank you SO much for stopping by.  It truly means the world to me.

Kelly

Monday, December 3, 2012

Christmas Mantel


Hi there! I'm so glad you stopped by.

I'd like to show you my Christmas Mantel.


My starting point, the window I used in my fall mantel. 

This is another one of my "dumpster rescues"! As I told you in a previous post, I work for a remodeler and all the carpenters know what kind of things I dig out of the dumpster. So, when they have something from a job site that they think I will like, they bring it back to the office for me. This window was one of them.

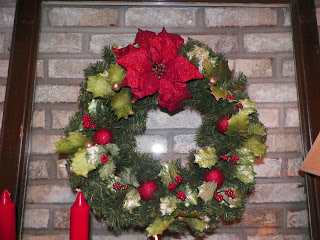
I made the wreath last year, for a boutique. It didn't sell, so I decided to use it this year.  

It is not what I would normally use, but I really like the colors, so I decided to decorate around it.


Have you ever made your own wreath? It is SO simple. 

I went to Michael's, bought a plain wreath and a group of holly and berries in a bunch.  I cut them apart, hot glued them on to the wreath and added some red and gold bulbs. If I can do this, anybody can!


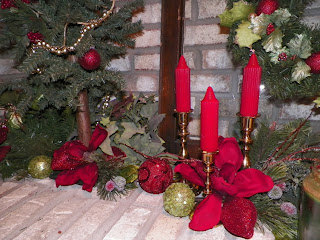
The lamp was also from my fall mantel.  I love the ambiance of it and thought it would be perfect for the Christmas mantel.  I added a poinsettia, some bulbs, a pine branch and a gold pick I had.


On the other side, I added this little Christmas tree and decorated it.


I added a few brass candlesticks with red candles, some more poinsettias and bulbs.  Super easy!


Turn on the fire, sit back and relax!

There is a lot more decorating to do, so the relax part is coming.....soon I hope!

Thank you so much for stopping by.  It means the world to me.

Kelly

Monday, November 26, 2012

Family Tradition; The Christmas Tree

Hi there! I'm so glad you stopped by.

A few years ago we started a Family Tradition. The Saturday after Thanksgiving, we go to the Pinestead Tree Farm in Isanti, Minnesota, to cut down our Christmas tree.

There is something special about going out in to the field, picking out "our" tree and cutting it down. You know what makes it extra special? Doing it with our family! 

It means so much to us that our 5 children and their families take the time out of their busy lives, to make memories with their parents and grandma.


My husband and I are the only ones that get a tree on our outing, but all of our children, their spouses/significant others, our grandchildren and my mom come along.  4 Generations!

It is truly my favorite activity of the year. 

Pinestead is such a charming place. They have hay rides, animals, a gift shop, a snack bar, bon fires for roasting hot dogs, hot apple cider and Santa.


Here is their gift shop.


Here are the llamas.

I think they are just the goofiest looking animal. And, they spit!  Seriously, spitting animals?  Who says God doesn't have a sense of humor.


And, a rooster. 

I'm not sure if there were any chickens.  This grandmas was far too busy trying to get pictures of these Kodak moments to find chickens.


This is our granddaughter, Presley.  Maybe she was looking for the chickens.....


We found our perfect tree!


My husband and our oldest grandson, Logan, he's 4, cutting down our tree. 

Logan started supervising his grandpa last year and takes his role as the oldest grandson, pretty seriously.


My tree cutting team!


Here is Logan taking the tree back to the shop. Is this child amazingly strong or am I prejudice?  Okay, so the tree was on a sled, that's just details.


Here we have Santa. Not looking all too happy, I might add. 

Have you ever tried to put 5 children, 4 years old and younger, on Santa's lap for a picture. Let's just say, some were not very thrilled about this Santa idea. Perhaps that would explain the look on Santa's face?


Even Gracie, the granddog, got to come along.   Other than running through the field at the speed of light, I do believe this was her favorite part, the hay ride.


Presley (2), Gabriel (1), Logan (4), Micah (1) and Elle (4).

These little punkins are what make my heart smile!

Do you have a Christmastime tradition? Want to start one?  The Pinestead Tree Farm would be a great place to start.


Thank you so much for stopping by.  It means the world to me.

Kelly

Tuesday, November 20, 2012

Thanksgiving Wine Tags

Hi there!  I'm so glad you stopped by.

I want to share a last minute idea I have with you. Wine glass tags.

I don't know about your Thanksgiving guests, but mine like wine!  So, I figured I would whip up some tags for everyone.


These are so easy to make. It took me less than an hour, including gathering the supplies.


All you need is:
Burlap ribbon
Twine
Key tags
Black marker
Number stencil


All I did was take the wire ring out of the key tag, place my stencil on the key tag, outline the number and fill it in. 

I used the Martha Stewart stencil because they have a stickiness to the back, which keeps them in place while you outline the number.


I laid the key tag on the burlap, cut out a circle a little wider than the tag and outlined the circle where the twine would go through, with the marker.  Then, I used a hole punch to make the hole for the twine.  String the twine through the hole, wrap it around the glass, tie a bow and Waa Laa!  Wine tag!


I hope you enjoyed this super easy, last minute idea!

Thank you so much for stopping by.  It means the world to me.

Kelly

Monday, November 19, 2012

Thanksgiving Table

Hi there!  I am so glad you stopped by.

Thanksgiving is Thursday!  Boy, did that sneak up on me.  

I love the holidays and look forward to all the friend and family get togethers. 

I especially enjoy decorating and making our home warm and cozy, for our guests. 

I want to show you some of the ideas I came up with for decorating my table. One is a little rustic, the other a little more "fancy".

Hopefully, this will give you a little inspiration and show you how easy it is to take what you have around your house, to make an inviting table.


For this one, I used chargers I got at Walmart last year, on clearance, after the holidays. Don't have chargers, use napkins, wrapping paper or strips of burlap.  Use your imagination and use what you have around your house.


Simply add candles, some greens and pine cones.


I bought the green leaf cut outs at Hallmark, half off. Score!  I slipped them in between the 2 plates just to give it a little dimension.

I also got the little acorn cut outs that say "I am thankful for".  I am going to have all our guests write what they are thankful for this year, put them in a basket and take them out one by one.  We will read them and try to figure out who wrote them.


For the other style I used gold chargers that I got as a gift from my girlfriends. 


Don't you just love the candle with it's own mind, leaning to the side? 

For this look I added color with some fall leaves and berries. 


The flower in the middle of the plate, as well as the berries, I bought as a bunch.  I popped the flowers off the stems and laid them on the plate.  For the berries, I just cut the bunch apart and added them for color.


So, which one do you like? More elegant or casual?

Thanks so much for stopping by.  It means the world to me!

Happy Thanksgiving!

Monday, March 5, 2012

Bathroom Makeover Reveal

Hi there.  I'm so glad you stopped by!

I can't believe it, I'm finally done! 

The bathroom is complete and I am so excited to share it with you.

I'd like to show you some before and after pictures, but I'm going to do this backwards and show you the pretty "after" pictures, first.


Can you believe this is the same room?


I love the new mirror and light fixtures.  I fell in love with them in the Pottery Barn catalog, but did not fall in love with the price.  I searched and searched and found them at Lowe's.  They were 1/3 the price.


I love how the vanity turned out.  It was so easy!  I put on one coat of primer and 2 coats of Hirshfields Platinum Ceramic Satin finish (all in one paint and primer).  The color is called White Fence. This paint is AMAZING!  It costs a little bit more, but so worth it.

I found the knobs at myknobs.com.  You know when you have a certain style and finish in mind and you are on a mission to find it.....that would describe my quest for the cabinet hardware.


Check out the rubber band on the lower doors.  This is to keep our basset hound out of the cabinet....and garbage can. Yep, she's a dumpster diver.


A little decorating.............


A little more decorating.......


Remember the fabric I showed you that was my inspiration and starting point......


I used it to make the shower curtain.  I'm pretty pleased with how it turned out.


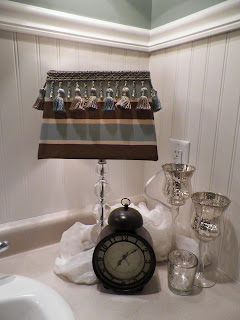
And, used some of the leftover fabric to makeover this lampshade.


So, this is our new bathroom.  What do you think? I think I can't wait to have people over and light those candles!

Stay tuned for our next makeover......the kitchen/dining room.

Thanks so much for stopping by.  It means the world to me.

Kelly

Turkey and Veggie Egg Bake

Hi!  We're so glad you stopped by!  I apologize for the lack of recipe updates.  To be honest, I didn't think anyone would want ...