Showing posts with label Crafts. Show all posts

Thursday, March 1, 2018

Easter Bunny Banner


Hi there!  We are so glad you stopped by.


Today I want to share an easy spring craft with you.


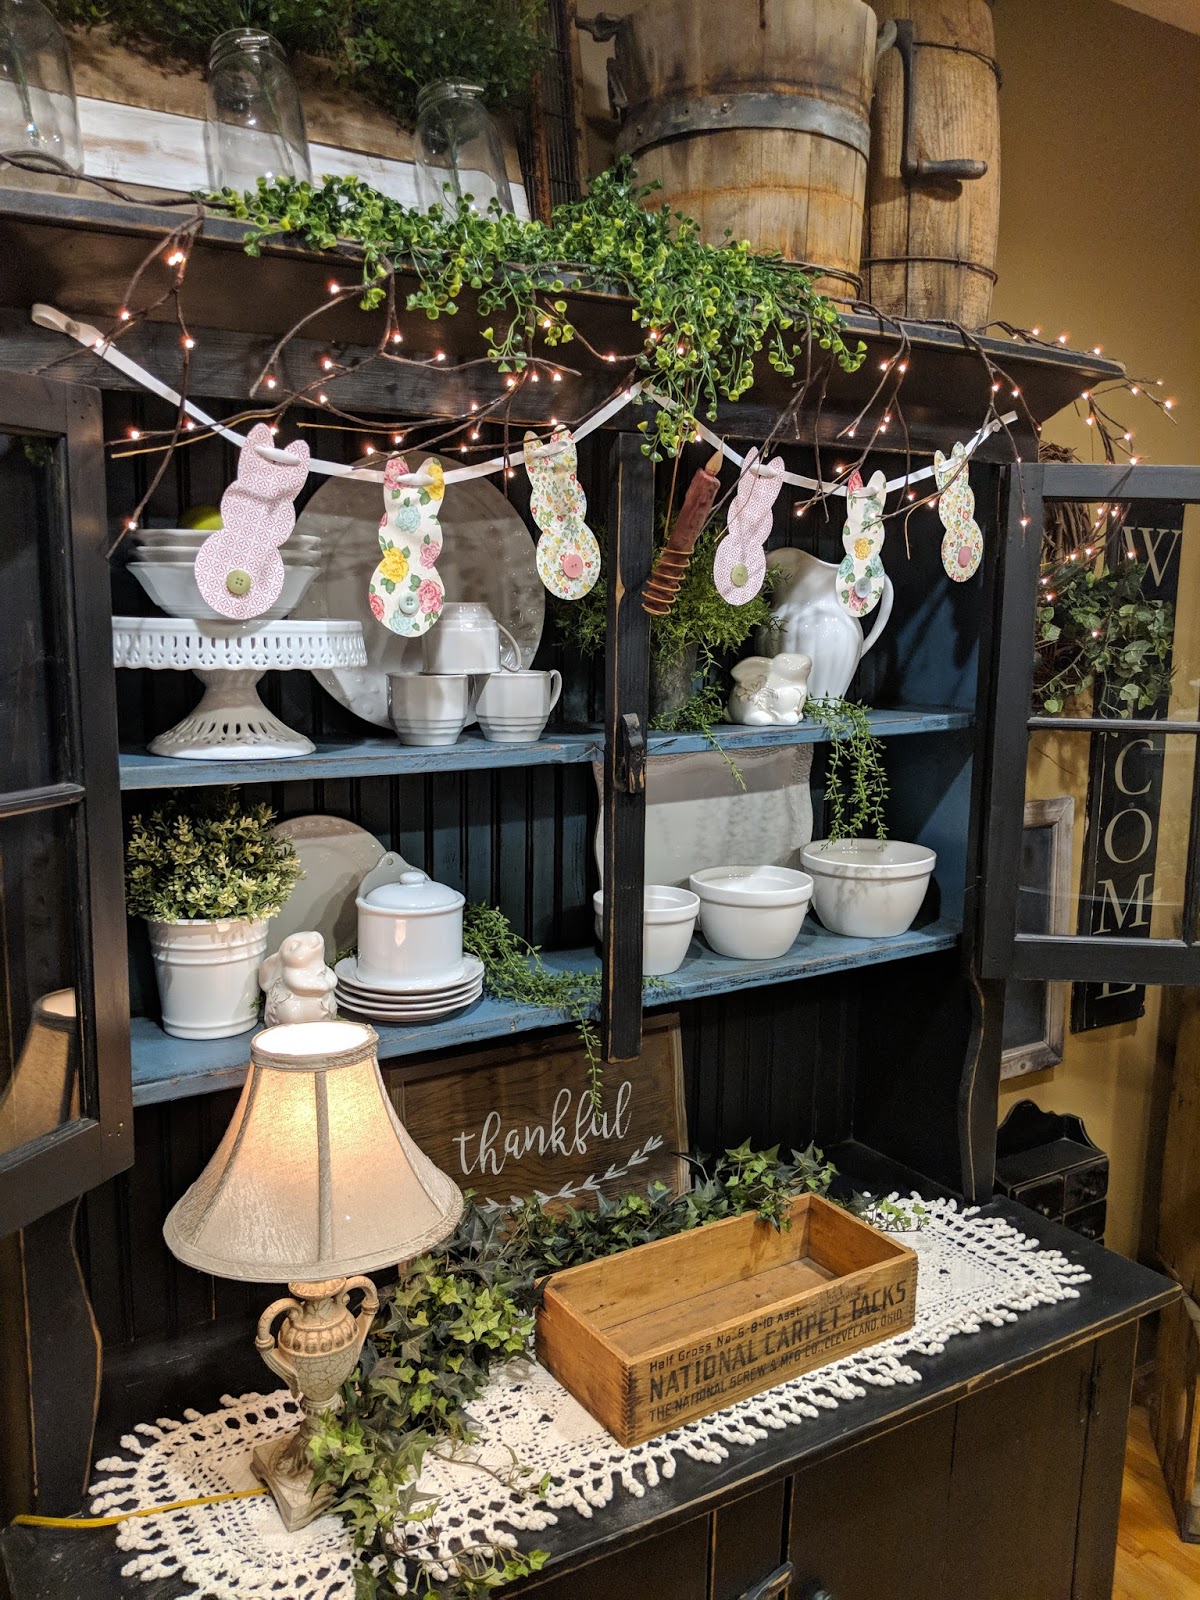
An Easter Bunny Banner.


Here is what you will need.......


Paper, bunny template, and ribbon.


I chose a springy print for this project.


I considered using music pages with black ribbon, 

but I wanted to stay with my spring colors for this project.  

I do love the simplistic look of black and tan though.


I also used my hole punch for the holes to thread the ribbon through.


Lastly, buttons for the bunny tails.


I started by printing a bunny template.  


I found mine on Pinterest, but if you search on Google 


you will find tons of options for the look you are going for.


I cut out the template and traced it on the BACK of my paper.


I do that so that if I don't cut exactly on the lines, you don't see it.


Cut out your bunnies.  I decided on 6 for this project.


Next, I hot glued a button on each bunny to create a tail.


Thread your ribbon.


I brought the ends together to make the bow, 


which is how I attached it to the lamp shade


I couldn't decide if I wanted to hang them on my lamp or my hutch.


I do love to decorate my lamp shades.  


I just think it adds that extra touch when decorating.


I finally decided on the hutch.


Honestly though, I do think I like them better on the lamp.


I hope you will try this out.  It is so easy and inexpensive.

You probably have all of the materials in your house right now.


Happy crafting!


Kelly and Tiffany


If you enjoy our blog, we would be so excited if you would show some love 

and become a follower (on the right hand side of the page) 

and like us on Facebook.

Monday, October 16, 2017

Lamp Revamp


Hi there!  We're so glad you stopped by.


We are humbled and overwhelmed by all of the people that took the time to view our last post.  Thank you so much, every single one of you.  You are what makes this worthwhile.


Today I want to show you how easy it is to give new life 
to that item you have sitting in a corner someplace.


Here is a little lamp I found a few years ago. 
I loved the look of it, but the color did not work in my home.


 I started by painting it with Chalk paint.  

This is such an awesome product.  

It goes on like butter and you only need a little bit.


 Next, I applied the antiquing glaze.  

Rub it all over, making sure to get it in the grooves.

Simply wipe off the excess until you get the look you're going for.


I love how it turned out!


The great thing about this product is it gives the painted portion an aged look.

I love how it stays in the grooves giving it the dimensional look I was going for.

I attached wired burlap flowers. I twisted the flower around each wire.

Tied a burlap bow around it, and viola, a lampshade!


I'm not sure where I'll end up keeping it, 
so I moved it to a few different places 
and took pictures so you can see that you can use it in
 so many areas of your decor.


It could go here.....


here.......


or even here.

Move things around, step back, 
and decide where it makes your heart the most happy. 


I think I will be using on the shelf in our office. 


Thank you so  much for stopping by.  It means the world to us.

Blessings,

Kelly and Tiffany

Thursday, January 21, 2016

Washi Tape Clothes Pins

QUICK TIP! 
Ditch the scrapbook paper, mod podge, and loose glitter!  Use Washi tape to give your clothes pins a mess free, colorful makeover!

My favorite clothes pin uses: 

- Hang the children's artwork 
- Make Clothespin wreaths
- Make magnets for the fridge

DIY Valentine's Day Decor

HELLO!!  We're so glad you stopped by!
You may have noticed, but my mom and I have not posted anything in quite some time.  Between the two of us, we had a very busy 2015.  My sister got married, so wedding planning was in full swing.  Mom landed her dream job with the St. Paul Police!  I graduated college and had a full time law office internship, my husband was required to relocate for his promotion, so we had to get our family and house prepared for a move that ultimately never happened because the same position opened up at his current location (Praise God!) 
But, we're BACK.  And we have a lot of great things we are going to be sharing with you! 
Valentine's Day is hands-down my favorite holiday/season to decorate for.  I am as girly as they come.  Any reason to bust out pink decor and glitter is my kind of party!
I am going to share very quick, easy DIY Valentine's Day decor pieces that you can create with pieces from the dollar section at Target!
Bakers Twine.  I literally tie this stuff around everything I can!  Tie them around candles to give them a "pop" of color.  Spools of twine: $1
Felt cut-out letters.  Also in the dollar section at Target.  I had a burlap wrapped canvas in my craft room, so with the felt and the bakers twine, I was able to throw this together in seconds.  
Add scrapbook paper to frames.  I got a 10 pack of Valentine themed paper for $1.  
I got the black frame and the "C" at Hobby Lobby.  The rose balls are also from Target, but they were not in the dollar section.  You could easily make these with artificial flowers and Styrofoam balls (see our spring flower balls post!)

I have a Cricut machine, so I used more of the scrapbook paper to cut out phrases to frame.  
It is hard to see the smaller frame, but it says "I love you a bushel & a peck"


Candles.  I found plain pink candles at Walmart.  I believe they were $.50 a piece.  This was my chance to bust out my glitter!  I brushed Mod Podge onto the candles (I used the Gloss finish).  Then I used white/iridescent glitter.  You could even use Epsom salt if you have that around the house.  My husband hates finding glitter all over the place, so I spray hairspray over the glitter when I am done to prevent it from falling off!

The silver "&" was also from the Target dollar section.  It was $3.  This could also be recreated by buying a wooden letter, brushing mod podge on the letter, and sprinkling Glitter or Confetti over the glue.  You will probably pay more for the supplies than you would just buying the item at Target, though.


So, where did I get those pink candlesticks?  My mom's garage sale.  I bet she regrets giving them to me now :) If you are not lucky enough to find something like this at your mom's house, most thrift stores are bursting at the seams with candlesticks!

They looked like this:  


I used True Red, Dragonfruit, and Bubblegum pink acrylic paint by Americana.  You will have to apply a few coats of paint.  I think I did three?  


Originally I was going to do flower balls on the candle sticks, but I ran out of brads and flowers.  


((Hang in there... I'm almost done!)) 

I got a pink chalkboard in the Target dollar section.  This one was also $3.  I used gems to monogram the chalkboard.  Originally I wanted to line the chalkboard with flowers, but I ran out of those too.  It was -30 degrees outside and I was not leaving the house to get more.  


Instead, I painted the legs, and added flowers that I currently had on hand to finish the chalkboard.


And lastly.  I needed to create something to hold all of my gummy flowers that I cannot. stop. eating.  This would make a perfect teacher gift for your children to bring on Valentine's Day! 

You guessed it.  I got the jar in the target dollar section.  They also have pink and red! 
I glued burlap around it, and wrapped my trusty bakers twine around it.  


If you are wondering... yes, I did eat all of the gummies.  Presley will have to get some more for her teacher! 

Stay tuned, I will have more Valentine's Day ideas for you next week!

Thursday, March 5, 2015

Transforming a Cardboard Box

Hi there!  I am so glad you stopped by.
I want to show you the cheapest, 
easiest way to make a pretty storage box, 
with things you already have.
Are you like me and you hate to throw out a good cardboard box?
I feel guilty every time I throw one out.
But, I have this strange obsession with things-that-hold-things.
Here is a super easy way to transform them in to storage.
Here is what you will need:
Cardboard box
Wrapping paper
Ribbon and bow
Tape
Measure your paper to go all the way around the box, 
and secure it with tape.
It's just like wrapping a present.
Finish the bottom.
Make a cut at each of the corners, down to the box.
You are going to want to "wrap" the inside, too.
Tuck the paper inside and secure with tape.
When you're done, it will look like this.
You could leave it just like this, but I wanted to dress it up a bit........
Add a piece of ribbon and a bow.  I secured mine with hot glue.
There you have it.  You can recycle and have pretty storage, too.
You could use different size boxes with coordinating paper, for even more storage.
I use mine to store candles, but you can use this for so many things. 
They are cute on a shelf, in the linen closet, under your sink.  The options are endless.
I hope you enjoyed this simple project 
and it inspires you to make those cardboard boxes 
in to something pretty and useful.
Thank you so much for stopping by!
Until next time,

Monday, July 21, 2014

DIY Chalkboard

Hi there!  We're so glad you stopped by!  
I wanted to share something I made, and possibly give you a gift idea for any upcoming bridal showers, engagement parties, or any other miscellaneous events that people may be counting down to (babies, birthdays, vacations, Holidays, Etc...) 
Kelly is usually the creative genius when it comes to crafts, but I had to create a gift on a budget that I wanted to share for anyone else who may need some inspiration for something quick and affordable.
 
A countdown chalkboard!
 
I took step-by-step photos as I was making it, but the photos have since become inaccessible.  I'm sorry! 
 
I bought the chalkboard at a local craft store, as well as the large burlap flower.  I used my cricut machine to cut out the letters.  If you do not own a cricut, you can buy precut letters in the scrapbook section of any craft store.  Instead of buying the expensive cricut vinyl, I buy contact paper at the dollar store.  After the recipients are married, they can easily peel the "I DO" off of the chalkboard and use it for other events. 
The pink frame is actually a small chalkboard that I glued to the larger chalkboard.  
The supplies cost approximately $10, and it took less than 20 minutes to make. Perfect for busy moms!

Wednesday, June 25, 2014

New Look For Old Lawn Chairs

Hi there!  We are so glad you stopped by.
Today I wanted to share what I did with some old, beat up, ready for the garbage, lawn chairs.
I've had these chairs for years.  They have served their purpose quite nicely in our backyard.  When I bought new chairs, I put these 2 chairs away knowing that they could be used at our cabin.
A few weeks ago, I packed up some supplies to re-do them and off I went.
Here is what they look like now.........
Here is the horrible before picture
I believe they were green when I first bought them.  
I painted them brown and when I grew tired of that, I painted them tan.
Here is all you need for this project.
Rust-Oleum spray paint, 4 cans. 2 for each chair (I used the color Lagoon)
Plaid white enamel craft paint
A round sponge (I used a Martha Stewart sponge I already had)
A through away pie pan (which I use and re-use, so it's not really a throw away pan)
I gave the chairs 2 coats of spray paint, letting them dry in between coats.
Next, I sponged on white circles.
I didn't want to have your typical chairs. I wanted them to have a little bling, shall we say.
That's it.  Super easy and super cheap!
Lastly, sit down and enjoy the view.
Don't throw away those old chairs, dress them up and give them a new life. 
Thank you so much for stopping by. It means the world to us!
Happy painting!

Tuesday, December 17, 2013

Barn Wood Christmas Tree Box

Hi there.  We are so glad you stopped by!
Today, I want to share with you my newest, or should I say oldest, treasure.
It has a wonderful story behind it, which makes it so special to my husband and I.
It's our Christmas tree box.
My husband's cousin and his wife, now live on the farm that was once their grandparent's.  
On this homestead there is a grand barn.  After many, many years, the barn is going to be taken down.  My husband asked them if they would mind if we took some of the old barn wood. They said yes.  
I'm not going to lie, I did a happy dance.  More than one happy dance, actually.
We scored many treasures that day, which included a few barn doors and an old cow watering dish.  
Oh, be still my heart.
Well, as soon as we got the wood, I asked my husband if he would make a box for our Christmas tree.  
He agreed!
Every year we go with our children and grandchildren and cut down a real tree. 
The box had to be big enough to hold the tree stand, that would hold the water, for the tree. 
Because these stands are bigger than your typical stand, the box had to be bigger as well.
Since I need to water the tree, I needed to be able to access the stand.
So, our box had to have a door
Among some of the great items we were so blessed to be able to have, were old hinges.
  
What could be more perfect on an old barn wood box, with a door, than old hinges?  
I know - I was giddy with excitement!
I did not want to take away from the look of our Christmas tree box, so I decorated with white and silver bulbs, clear and metal snowflakes, pearls, and of course, burlap!
  
I thought it was the perfect look to go along with our new/old box.
This year I have fallen in love with all the different ways you can display your Christmas tree.  I thought this idea fit right in.
I hope this gives you that little push to try something different. 
Thank you so much for stopping by.  It means the world to us.

Turkey and Veggie Egg Bake

Hi!  We're so glad you stopped by!  I apologize for the lack of recipe updates.  To be honest, I didn't think anyone would want ...