Monday, December 30, 2013

Baked Ravioli

Hi there!  We're so glad you stopped by!
 
I cannot take credit for coming up with this recipe all on my own.  I had seen a ton of pins on pinterest for baked ravioli recipes.  I never actually looked at any of them, I just thought "That sounds really good" and I moved on.  Fast forward a few weeks.  I was lacking ingredients for all of the dinners I wanted to make, so I was going to make my usual go-to dinner when I need to go grocery shopping (Spaghetti. I'm sure I'm not the only person that always has noodles and pasta sauce on hand at all times...) Anyways, I opened the freezer to grab a pound of hamburger and I saw a bag of ravioli.  Light bulb. 
 
Here is easiest recipe of all time!  Baked Ravioli. 
 
 
What you'll need: 
1 jar spaghetti sauce (I use classico) 
1 bag frozen ravioli (larger raviolis) 
1 C. shredded cheddar cheese
1 C. shredded mozzarella cheese
 
Preheat over to 400. 
Layer a 9x13 pan like you would while making lasagna.  Like this:
Lightly spread spaghetti sauce on the bottom of the pan
Ravioli
Spaghetti sauce
1/2 C of cheddar cheese, 1/2 C of mozarella
Raviloli
Spaghetti sauce
Cheese
 
Cover and bake for 30 minutes.  After 30 minutes, remove the foil and bake for an additional 10 minutes or until the cheese has melted.  

Thursday, December 19, 2013

Christmas Around My House

Hi there.  We are so glad you stopped by.
Day 3: Christmas Around My House
I don't know about you, but I love to see how people decorate for Christmas.
Since there aren't enough days in the week, or hours in the day for us to go to everyone's house, I thought I would invite you to my house through my blog. 
Welcome to our home!
Let's start at our front porch.
  
I found this adorable pillow at Home Goods and decided to decorate around it.
The plaid "blanket" slung over the chair, is actually a tablecloth. 
 
Come on in to our living room and sit a spell.
  
We can turn on the fireplace and the lights on the mantel, for a warm cozy feel.
A quick and easy addition.  
Take a bucket, add some pine, branches and a burlap bow. 
Here is our sitting area off the kitchen.  
Speaking of the kitchen.....
I kept it very simple this year.  I'm loving the soft earthy colors.  
A little spruce with a snowman, set in a tray with a few rusty stars.
The top of the refrigerator is a great place for a display.  
A winter wreath and we're done here.
The area above my pantry cabinet......
No flat space shall be left untouched.  
A little more pine and a reindeer covered in a sweater.  Yes, please!
A pine tree in a basket with a little spruce twig.
A simple wreath above the sink, with a burlap bow.
We can't forget the island.  A vintage-y Santa, lantern and a little more pine.
Put a doilie underneath to give it a little warmth.
Our kitchen table.  
A simple basket with burlap, pine cones and berries.  
Add a poinsettia and a berry clip and you're done. 
Thank you for stopping by for a visit.  I loved having you.

Tuesday, December 17, 2013

Barn Wood Christmas Tree Box

Hi there.  We are so glad you stopped by!
Today, I want to share with you my newest, or should I say oldest, treasure.
It has a wonderful story behind it, which makes it so special to my husband and I.
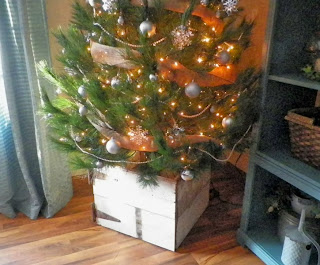
It's our Christmas tree box.
My husband's cousin and his wife, now live on the farm that was once their grandparent's.  
On this homestead there is a grand barn.  After many, many years, the barn is going to be taken down.  My husband asked them if they would mind if we took some of the old barn wood. They said yes.  
I'm not going to lie, I did a happy dance.  More than one happy dance, actually.
We scored many treasures that day, which included a few barn doors and an old cow watering dish.  
Oh, be still my heart.
Well, as soon as we got the wood, I asked my husband if he would make a box for our Christmas tree.  
He agreed!
Every year we go with our children and grandchildren and cut down a real tree. 
The box had to be big enough to hold the tree stand, that would hold the water, for the tree. 
Because these stands are bigger than your typical stand, the box had to be bigger as well.
Since I need to water the tree, I needed to be able to access the stand.
So, our box had to have a door
Among some of the great items we were so blessed to be able to have, were old hinges.
  
What could be more perfect on an old barn wood box, with a door, than old hinges?  
I know - I was giddy with excitement!
I did not want to take away from the look of our Christmas tree box, so I decorated with white and silver bulbs, clear and metal snowflakes, pearls, and of course, burlap!
  
I thought it was the perfect look to go along with our new/old box.
This year I have fallen in love with all the different ways you can display your Christmas tree.  I thought this idea fit right in.
I hope this gives you that little push to try something different. 
Thank you so much for stopping by.  It means the world to us.

Monday, December 16, 2013

Rustic Christmas Mantel

Hi there.  We are so glad you stopped by! 
I don't know about you, but Christmas for me, is coming up quickly.
I don't know if it's because we have been so busy this year, or if age has something to do with it.  I swear the older I get, the faster time goes.
So let's not waste another minute.  I want to share our Rustic Christmas Mantel with you.

I am really loving burlap and brown this year.  The simplistic look of it just feels cozy to me.
I picked up these metal angels and the burlap poinsettia this fall and decided they would be the theme for my mantel.
I started with my old window as the base piece.
I put a string of lights behind it to give it a nice glow.
A simple way to spruce up your Christmas trees is to put them in a crock surrounded by burlap.  
I love this look.  Simple meets cozy.
On the other side, I decided to add lights, burlap and ornaments to this tree, and batting in the crock, to give it the look of snow.
I added pine branches around the crocks, tucked in some bulbs, pine cones and twigs.
There you have it.  My Christmas Mantel.
Thank you so much for stopping by and taking a look.  It means the world to us.
Happy Decorating!

Tuesday, October 22, 2013

Living Room Before and After

Hi there. We are so glad you stopped by!
Last week I did a post about taking 2 bookcases and turning them in to an entertainment center.
This week, I thought I would follow that up with how we turned the living room, where the entertainment center is, in to a brighter more up to date room.
Come on in!
Let me start by telling you, back in the day when we bought our house, this was our 2 car garage!
We removed the door in between the garage and the entryway.  
Then we opened up the wall to make it feel as though it had always been this way. 
We then raised the floor so that it would be even with the entryway.
The picture above, is the view from the living room, in to the entryway.
This is the view from the entryway in to the living room.
When we turned the garage in to our living room, a very dear friend of ours added this beautiful fireplace. 
It has always been one of the favorite features of our home.
I guess I'm not the only one that loves the fireplace.
Our dog Isabelle, loves the fireplace, too.
Zoom to 2013. It was time to update the garage, I mean living room!
Come and take a peek at our new look.
We painted the walls a light cream color to make the space feel brighter.  It was quite a change from the deep red, but so refreshing to me.
I basically turned the colors around. 
Before; dark walls, light furniture.  After; light walls and dark furniture.
I updated the items on the mantle.  
I think the fireplace looks better with the new wall color, too. It blends in with the room better.
The long wall to the right, when you walk in to the room.
This is a very poor quality picture, but I wanted you to see how I made the window appear bigger.  
I hung the curtain rod as high up as I could and past the sides of the windows.  
(This was once where the garage door was)
Here's the entertainment center I told you about last week.  It used to be 2 bookcases. 
I love how it fills up this wall.
One more before picture..............
.........and the after!
Isn't it amazing how changing the color can make such a huge impact.
Paint is your best friend.  You should invite it over.....often.
Thank you so much for stopping by my home.  I loved having you!

Wednesday, October 16, 2013

How To Make An Entertainment Center

Hi there!  We are so glad you stopped by.
Do you ever look at something you have and just know you can turn it in to something better?  It has good bones so you don't want to replace it, you just want to update it. Give it some love.
Here is a picture of my "something". 
Because we purchased a new television, I had to do an update.  This television stood on its own. Our new one would need to sit on something.
I had these great bookcases, that were given to me quite a few years ago.  They are well built, just not my style anymore. 
The television you see in the picture was leaving us, but I liked the idea of wall unit.
Here is what we did to turn 2 bookcases in to an entertainment center that I love, very inexpensively.
I had my assistant in all things wood, add some shelves and a piece of molding across the top to make it look like it's all one unit.  I'm sorry, I didn't take a picture of the before with the molding attached.
After he got them all attached, I decided I didn't like the second shelf from the top.  
So, he took it out for me.
Sometimes things look better in  my head!
I got some primer that will go on any finish and primed away.
I took the doors off and removed the floating shelves.
  
It is so much easier to paint them if they are laying flat. 
The paint I used was Sherwin Williams. The color is Riverway. 
I added some updated hardware, in Oil Rubbed Bronze finish......
And, my favorite part, I decorated it.
I love the color.  It shows nicely with the browns and greens of the accessories I used.
Here's a close up of the other side.
I knew those baskets would come in handy one day!
Here's one more picture of the before.............
And, the after, with a little love!
There you have it.  An easy transformation using what I already had!
 
Thank you so much for stopping by.  It means the world to us.

Turkey and Veggie Egg Bake

Hi!  We're so glad you stopped by!  I apologize for the lack of recipe updates.  To be honest, I didn't think anyone would want ...