Monday, November 26, 2012

Family Tradition; The Christmas Tree

Hi there! I'm so glad you stopped by.

A few years ago we started a Family Tradition. The Saturday after Thanksgiving, we go to the Pinestead Tree Farm in Isanti, Minnesota, to cut down our Christmas tree.

There is something special about going out in to the field, picking out "our" tree and cutting it down. You know what makes it extra special? Doing it with our family! 

It means so much to us that our 5 children and their families take the time out of their busy lives, to make memories with their parents and grandma.


My husband and I are the only ones that get a tree on our outing, but all of our children, their spouses/significant others, our grandchildren and my mom come along.  4 Generations!

It is truly my favorite activity of the year. 

Pinestead is such a charming place. They have hay rides, animals, a gift shop, a snack bar, bon fires for roasting hot dogs, hot apple cider and Santa.


Here is their gift shop.


Here are the llamas.

I think they are just the goofiest looking animal. And, they spit!  Seriously, spitting animals?  Who says God doesn't have a sense of humor.


And, a rooster. 

I'm not sure if there were any chickens.  This grandmas was far too busy trying to get pictures of these Kodak moments to find chickens.


This is our granddaughter, Presley.  Maybe she was looking for the chickens.....


We found our perfect tree!


My husband and our oldest grandson, Logan, he's 4, cutting down our tree. 

Logan started supervising his grandpa last year and takes his role as the oldest grandson, pretty seriously.


My tree cutting team!


Here is Logan taking the tree back to the shop. Is this child amazingly strong or am I prejudice?  Okay, so the tree was on a sled, that's just details.


Here we have Santa. Not looking all too happy, I might add. 

Have you ever tried to put 5 children, 4 years old and younger, on Santa's lap for a picture. Let's just say, some were not very thrilled about this Santa idea. Perhaps that would explain the look on Santa's face?


Even Gracie, the granddog, got to come along.   Other than running through the field at the speed of light, I do believe this was her favorite part, the hay ride.


Presley (2), Gabriel (1), Logan (4), Micah (1) and Elle (4).

These little punkins are what make my heart smile!

Do you have a Christmastime tradition? Want to start one?  The Pinestead Tree Farm would be a great place to start.


Thank you so much for stopping by.  It means the world to me.

Kelly

Tuesday, November 20, 2012

Thanksgiving Wine Tags

Hi there!  I'm so glad you stopped by.

I want to share a last minute idea I have with you. Wine glass tags.

I don't know about your Thanksgiving guests, but mine like wine!  So, I figured I would whip up some tags for everyone.


These are so easy to make. It took me less than an hour, including gathering the supplies.


All you need is:
Burlap ribbon
Twine
Key tags
Black marker
Number stencil


All I did was take the wire ring out of the key tag, place my stencil on the key tag, outline the number and fill it in. 

I used the Martha Stewart stencil because they have a stickiness to the back, which keeps them in place while you outline the number.


I laid the key tag on the burlap, cut out a circle a little wider than the tag and outlined the circle where the twine would go through, with the marker.  Then, I used a hole punch to make the hole for the twine.  String the twine through the hole, wrap it around the glass, tie a bow and Waa Laa!  Wine tag!


I hope you enjoyed this super easy, last minute idea!

Thank you so much for stopping by.  It means the world to me.

Kelly

Monday, November 19, 2012

Thanksgiving Table

Hi there!  I am so glad you stopped by.

Thanksgiving is Thursday!  Boy, did that sneak up on me.  

I love the holidays and look forward to all the friend and family get togethers. 

I especially enjoy decorating and making our home warm and cozy, for our guests. 

I want to show you some of the ideas I came up with for decorating my table. One is a little rustic, the other a little more "fancy".

Hopefully, this will give you a little inspiration and show you how easy it is to take what you have around your house, to make an inviting table.


For this one, I used chargers I got at Walmart last year, on clearance, after the holidays. Don't have chargers, use napkins, wrapping paper or strips of burlap.  Use your imagination and use what you have around your house.


Simply add candles, some greens and pine cones.


I bought the green leaf cut outs at Hallmark, half off. Score!  I slipped them in between the 2 plates just to give it a little dimension.

I also got the little acorn cut outs that say "I am thankful for".  I am going to have all our guests write what they are thankful for this year, put them in a basket and take them out one by one.  We will read them and try to figure out who wrote them.


For the other style I used gold chargers that I got as a gift from my girlfriends. 


Don't you just love the candle with it's own mind, leaning to the side? 

For this look I added color with some fall leaves and berries. 


The flower in the middle of the plate, as well as the berries, I bought as a bunch.  I popped the flowers off the stems and laid them on the plate.  For the berries, I just cut the bunch apart and added them for color.


So, which one do you like? More elegant or casual?

Thanks so much for stopping by.  It means the world to me!

Happy Thanksgiving!

Monday, March 5, 2012

Bathroom Makeover Reveal

Hi there.  I'm so glad you stopped by!

I can't believe it, I'm finally done! 

The bathroom is complete and I am so excited to share it with you.

I'd like to show you some before and after pictures, but I'm going to do this backwards and show you the pretty "after" pictures, first.


Can you believe this is the same room?


I love the new mirror and light fixtures.  I fell in love with them in the Pottery Barn catalog, but did not fall in love with the price.  I searched and searched and found them at Lowe's.  They were 1/3 the price.


I love how the vanity turned out.  It was so easy!  I put on one coat of primer and 2 coats of Hirshfields Platinum Ceramic Satin finish (all in one paint and primer).  The color is called White Fence. This paint is AMAZING!  It costs a little bit more, but so worth it.

I found the knobs at myknobs.com.  You know when you have a certain style and finish in mind and you are on a mission to find it.....that would describe my quest for the cabinet hardware.


Check out the rubber band on the lower doors.  This is to keep our basset hound out of the cabinet....and garbage can. Yep, she's a dumpster diver.


A little decorating.............


A little more decorating.......


Remember the fabric I showed you that was my inspiration and starting point......


I used it to make the shower curtain.  I'm pretty pleased with how it turned out.


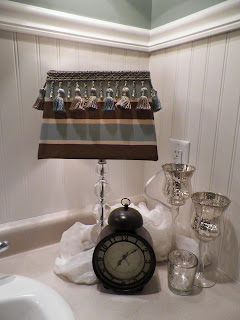
And, used some of the leftover fabric to makeover this lampshade.


So, this is our new bathroom.  What do you think? I think I can't wait to have people over and light those candles!

Stay tuned for our next makeover......the kitchen/dining room.

Thanks so much for stopping by.  It means the world to me.

Kelly

Monday, February 27, 2012

Lamp Shade Makeover

Hi there!  I'm so glad you stopped by.

As you know I have been working on my bathroom makeover.  I am hoping to have it all done by the weekend so that next week I can show you the before and after pictures.

Today, I want to share with you how I dressed up the lamp that will go on our vanity.

I have always had a lamp on the vanity, with a 15 watt light bulb in it, that I leave on all the time.  It's kind of like my night light.

I used the left over fabric and trim from making the new shower curtain.


All you need is a lamp shade, Mod Podge, glue gun, fabric, paint brush and clothes pins.

This would be the perfect project for a an ugly shade that has great shape, but is old and worn out or in need of a face lift.


I laid the fabric out on the table and cut around the shade, leaving it about 1 inch larger than the shade. 

Take the paint brush and generously apply Mod Podge to one side at a time. This is when I took the clothes pins and attached them to keep the fabric in place while it dried.


I did one side at a time, letting each side dry before gluing the next section. 


When I had all the sides done, I cut a small slit in the fabric where each wire meets the top of the shade. Don't cut all the way to the shade or you will have a slit that will show.

 I took the glue gun and glued the top and bottom to the inside of the shade. 

When I had the fabric glued to the shade, I took a piece of the trim and hot glued it to the top of the shade. 

That's it! 


What do you think?  Pretty darn easy, huh? 


Thanks for stopping by.  It means the world to me.

Kelly

Thursday, February 9, 2012

Changing Your Hardware, on the Cheap!

Hi there!  I'm so glad you stopped by.

I have decided that I am really sick of the decorating in my house. So, what's a creative girl to do? 
Redecorate of course!

I have 4 rooms that I want to bring some new life to.  First up, the bathroom. 

Here are a few before pictures so you can see what I'm up against. Check out that wallpaper. 

Can you say "Pain in my butt" to remove?


Oh, lordy!


Below is my inspiration.  I always pick one item to start a redecorating project with.  It can be a picture, a rug, a bedspread or fabric. In this case, I chose fabric.  I went to Hancock Fabrics and to my complete delight, this fabric was 50% off!  Yep, did the happy dance in the isle.


I am in love with this trim, which by the way, matches the fabric perfectly.  It even has glass beads on it.  

I decided that I should go with chrome in this bathroom since the faucets and toilet handle are chrome. Having the glass beads on the trim just cinched the deal.  And, look at how fabulous these Mercury Glass candle holders look with this fabric. Could you just die?  I snagged those babies at Kirkland's. 


Being the anal retentive person that I am, I noticed that the hardware on my bathroom door is antique brass.  Well, antique brass and chrome do NOT go together. I mean, please.

How awful would that have been to get completely done with the bathroom, be sitting on the toilet and notice the antique brass staring me right in the face...........

Instead of buying new hardware, which isn't in the budget, I decided to paint them. And let me tell you, it is so easy to do.

Start by taping off the area around the hardware.  I used Frog Tape and Scotch Blue Pre-taped Film for the door.  I should have used it for the entire area, but forgot I had it until I was almost done taping everything off.  Believe me, you will save tons of time with this stuff.


Check out this next picture.  I felt like I was in a hazmat area!  All this for 3 little hinges and a knob. 

Over kill perhaps?


Here is the "before" knob


All I did was lightly spray the knob and hinges with 2 coats of spray paint, waiting one hour in between coats. That's it!  It took longer to tape off the area then it did to paint the hardware. But it was worth it.

Here is the "after" knob.


And, the "after" hinges.


So, there you have it.  You don't have to change out your hardware to get a new look.  You don't even have to take the hardware off to paint it.  And, for the cost of a can of spray paint and how little you use for each item, you sure can't beat the price.

Check back often as I am going to be blogging the entire bathroom makeover.  See you next time.

Thanks so much for stopping by.  It means the world to me.


Kelly

Turkey and Veggie Egg Bake

Hi!  We're so glad you stopped by!  I apologize for the lack of recipe updates.  To be honest, I didn't think anyone would want ...